Integrations (FREE)
- Introduced in GitLab 12.4.
- Moved from GitLab Ultimate to GitLab Free in 12.8.
GitLab can accept alerts from any source via a webhook receiver. Alert notifications can trigger paging for on-call rotations or be used to create incidents.
Integrations list
Introduced in GitLab 13.5.
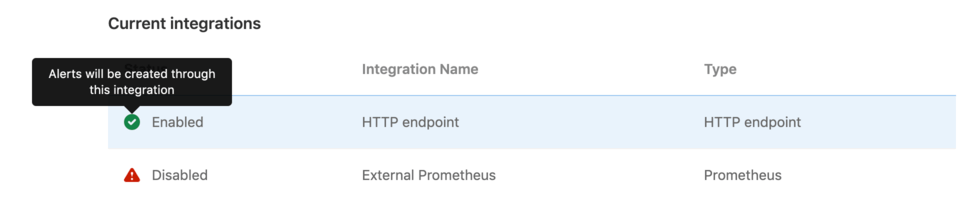
With at least the Maintainer role, you can view the list of configured alerts integrations by navigating to Settings > Monitor in your project's sidebar menu, and expanding the Alerts section. The list displays the integration name, type, and status (enabled or disabled):
Configuration
GitLab can receive alerts via a HTTP endpoint that you configure.
Single HTTP Endpoint
Enabling the HTTP Endpoint in a GitLab projects activates it to receive alert payloads in JSON format. You can always customize the payload to your liking.
- Sign in to GitLab as a user with the Maintainer role for a project.
- Navigate to Settings > Monitor in your project.
- Expand the Alerts section, and in the Select integration type dropdown list, select HTTP Endpoint.
- Toggle the Active alert setting. The URL and Authorization Key for the webhook configuration are available in the View credentials tab after you save the integration. You must also input the URL and Authorization Key in your external service.
HTTP Endpoints (PREMIUM)
Introduced in GitLab 13.6.
In GitLab Premium, you can create multiple unique HTTP endpoints to receive alerts from any external source in JSON format, and you can customize the payload.
-
Sign in to GitLab as a user with the Maintainer role for a project.
-
Navigate to Settings > Monitor in your project.
-
Expand the Alerts section.
-
For each endpoint you want to create:
-
Select Add new integration.
-
In the Select integration type dropdown list, select HTTP Endpoint.
-
Name the integration.
-
Toggle the Active alert setting. The URL and Authorization Key for the webhook configuration are available in the View credentials tab after you save the integration. You must also input the URL and Authorization Key in your external service.
-
Optional. To map fields from your monitoring tool's alert to GitLab fields, enter a sample payload and select Parse payload for custom mapping. Valid JSON is required. If you update a sample payload, you must also remap the fields.
-
Optional. If you provided a valid sample payload, select each value in Payload alert key to map to a GitLab alert key.
-
To save your integration, select Save Integration. If desired, you can send a test alert from your integration's Send test alert tab after the integration is created.
-
The new HTTP Endpoint displays in the integrations list. You can edit the integration by selecting the {settings} settings icon on the right side of the integrations list.
Map fields in custom alerts
Introduced in GitLab 13.10.
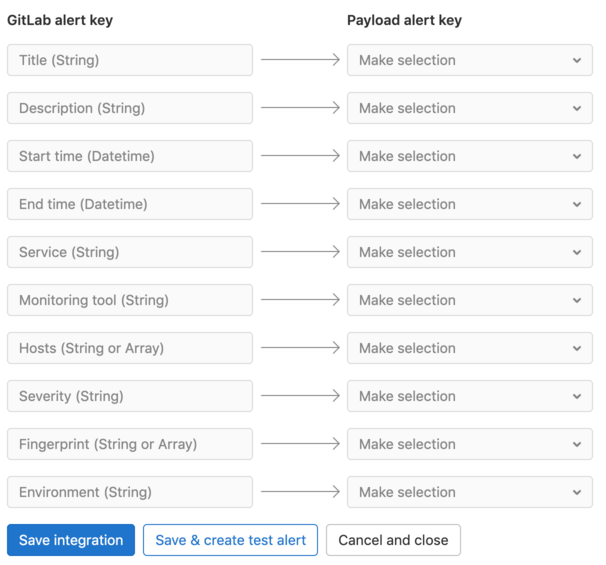
You can integrate your monitoring tool's alert format with GitLab alerts. To show the correct information in the Alert list and the Alert Details page, map your alert's fields to GitLab fields when you create an HTTP endpoint:
Customize the alert payload outside of GitLab
For HTTP Endpoints without custom mappings, you can customize the payload by sending the following
parameters. All fields are optional. If the incoming alert does not contain a value for the Title field, a default value of New: Alert is applied.
| Property | Type | Description |
|---|---|---|
title |
String | The title of the alert. |
description |
String | A high-level summary of the problem. |
start_time |
DateTime | The time of the alert. If none is provided, a current time is used. |
end_time |
DateTime | The resolution time of the alert. If provided, the alert is resolved. |
service |
String | The affected service. |
monitoring_tool |
String | The name of the associated monitoring tool. |
hosts |
String or Array | One or more hosts, as to where this incident occurred. |
severity |
String | The severity of the alert. Case-insensitive. Can be one of: critical, high, medium, low, info, unknown. Defaults to critical if missing or value is not in this list. |
fingerprint |
String or Array | The unique identifier of the alert. This can be used to group occurrences of the same alert. |
gitlab_environment_name |
String | The name of the associated GitLab environment. Required to display alerts on a dashboard. |
You can also add custom fields to the alert's payload. The values of extra parameters aren't limited to primitive types (such as strings or numbers), but can be a nested JSON object. For example:
{ "foo": { "bar": { "baz": 42 } } }NOTE: Ensure your requests are smaller than the payload application limits.
Example request body
Example payload:
{
  "title": "Incident title",
  "description": "Short description of the incident",
  "start_time": "2019-09-12T06:00:55Z",
  "service": "service affected",
  "monitoring_tool": "value",
  "hosts": "value",
  "severity": "high",
  "fingerprint": "d19381d4e8ebca87b55cda6e8eee7385",
  "foo": {
    "bar": {
      "baz": 42
    }
  }
}
Prometheus endpoint
Prerequisites:
- You must have at least the Maintainer role for the project.
- On the top bar, select Main menu > Projects and find your project.
- On the left sidebar, select Settings > Monitor.
- Expand the Alerts section, and select Add new integration.
- From the Select integration type dropdown list, select Prometheus.
- Turn on the Active toggle.
- Enter the Prometheus API base URL. You should enter a placeholder URL. The features which use this field are deprecated and scheduled for removal in GitLab 16.0.
- Select Save integration.
The URL and authorization key for the webhook configuration are available in the View credentials tab.
Enter the URL and authorization key in your external service. You can also send a test alert from your integration's Send test alert tab.
Add integration credentials to Prometheus Alertmanager
To send Prometheus alert notifications to GitLab, copy the URL and authorization key from
your Prometheus integration into the
webhook_configs
section of the Prometheus Alertmanager configuration:
receivers:
  - name: gitlab
    webhook_configs:
      - http_config:
          authorization:
            type: Bearer
            credentials: 1234567890abdcdefg
        send_resolved: true
        url: http://IP_ADDRESS:PORT/root/manual_prometheus/prometheus/alerts/notify.json
        # Rest of configuration omitted
        # ...
Expected request attributes
Alerts are expected to be formatted for a Prometheus webhook receiver.
Top-level required attributes:
alertscommonAnnotationscommonLabelsexternalURLgroupKeygroupLabelsreceiverstatusversion
From alerts in the Prometheus payload, a GitLab alert is created for each item in the array.
You can alter the nested parameters listed below to configure the GitLab alert.
| Attribute | Type | Required | Description |
|---|---|---|---|
One of annotations/title, annotations/summary, or labels/alertname
|
String | Yes | The title of the alert. |
startsAt |
DateTime | Yes | The start time of the alert. |
annotations/description |
String | No | A high-level summary of the problem. |
annotations/gitlab_incident_markdown |
String | No | GitLab Flavored Markdown to be appended to any incident created from the alert. |
annotations/runbook |
String | No | Link to documentation or instructions for how to manage this alert. |
endsAt |
DateTime | No | The resolution time of the alert. |
g0.expr query parameter in generatorUrl
|
String | No | Query of associated metric. |
labels/gitlab_environment_name |
String | No | The name of the associated GitLab environment. Required to display alerts on a dashboard. |
labels/severity |
String | No | Severity of the alert. Should be one of the Prometheus severity options. Defaults to critical if missing or value is not in this list. |
status |
String | No | Status of the alert in Prometheus. If value is 'resolved', the alert is resolved. |
One of annotations/gitlab_y_label, annotations/title, annotations/summary, or labels/alertname
|
String | No | The Y-Axis label to be used when embedding the metrics for this alert in GitLab Flavored Markdown. |
Additional attributes included under annotations are available on
the alert details page. Any other attributes are ignored.
Attributes aren't limited to primitive types (such as strings or numbers), but can be a nested JSON object. For example:
{
    "target": {
        "user": {
            "id": 42
        }
    }
}
NOTE: Ensure your requests are smaller than the payload application limits.
Prometheus severity options
Introduced in GitLab 13.9
Alerts from Prometheus can provide any of the case-insensitive follow values for alert severity:
-
Critical:
critical,s1,p1,emergency,fatal -
High:
high,s2,p2,major,page -
Medium:
medium,s3,p3,error,alert -
Low:
low,s4,p4,warn,warning -
Info:
info,s5,p5,debug,information,notice
The severity defaults to critical if the value is missing or not in this list.
Example Prometheus alert
Example alerting rule:
groups:
- name: example
  rules:
  - alert: ServiceDown
    expr: up == 0
    for: 5m
    labels:
      severity: high
    annotations:
      title: "Example title"
      runbook: "http://example.com/my-alert-runbook"
      description: "Service has been down for more than 5 minutes."
      gitlab_y_label: "y-axis label"
      foo:
        bar:
          baz: 42
Example request payload:
{
  "version" : "4",
  "groupKey": null,
  "status": "firing",
  "receiver": "",
  "groupLabels": {},
  "commonLabels": {},
  "commonAnnotations": {},
  "externalURL": "",
  "alerts": [{
    "startsAt": "2022-010-30T11:22:40Z",
    "generatorURL": "http://host?g0.expr=up",
    "endsAt": null,
    "status": "firing",
    "labels": {
      "gitlab_environment_name": "production",
      "severity": "high"
    },
    "annotations": {
      "title": "Example title",
      "runbook": "http://example.com/my-alert-runbook",
      "description": "Service has been down for more than 5 minutes.",
      "gitlab_y_label": "y-axis label",
      "foo": {
        "bar": {
          "baz": 42
        }
      }
    }
  }]
}
Authorization
The following authorization methods are accepted:
- Bearer authorization header
- Basic authentication
The <authorization_key> and <url> values can be found when configuring an alert integration.
Bearer authorization header
The authorization key can be used as the Bearer token:
curl --request POST \
  --data '{"title": "Incident title"}' \
  --header "Authorization: Bearer <authorization_key>" \
  --header "Content-Type: application/json" \
  <url>
Basic authentication
The authorization key can be used as the password. The username is left blank:
- username:
<blank> - password:
<authorization_key>
curl --request POST \
  --data '{"title": "Incident title"}' \
  --header "Authorization: Basic <base_64_encoded_credentials>" \
  --header "Content-Type: application/json" \
  <url>
Basic authentication can also be used with credentials directly in the URL:
curl --request POST \
  --data '{"title": "Incident title"}' \
  --header "Content-Type: application/json" \
  <username:password@url>
WARNING: Using your authorization key in the URL is insecure, as it's visible in server logs. We recommend using one of the above header options if your tooling supports it.
Response body
Introduced in GitLab 14.5.
The JSON response body contains a list of any alerts created within the request:
[
  {
    "iid": 1,
    "title": "Incident title"
  },
  {
    "iid": 2,
    "title": "Second Incident title"
  }
]
Successful responses return a 200 response code.
Triggering test alerts
Introduced in GitLab in 13.2.
After a project maintainer or owner configures an integration, you can trigger a test alert to confirm your integration works properly.
- Sign in as a user with at least the Developer role.
- Navigate to Settings > Monitor in your project.
- Select Alerts to expand the section.
- Select the {settings} settings icon on the right side of the integration in the list.
- Select the Send test alert tab to open it.
- Enter a test payload in the payload field (valid JSON is required).
- Select Send.
GitLab displays an error or success message, depending on the outcome of your test.
Automatic grouping of identical alerts (PREMIUM)
Introduced in GitLab 13.2.
In GitLab versions 13.2 and greater, GitLab groups alerts based on their
payload. When an incoming alert contains the same payload as another alert
(excluding the start_time and hosts attributes), GitLab groups these alerts
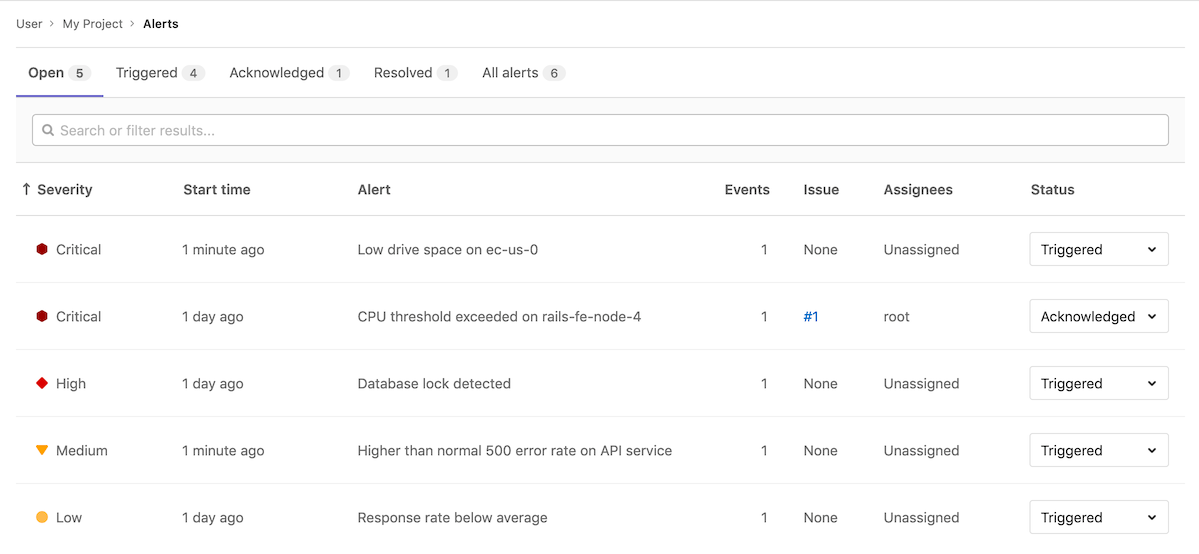
together and displays a counter on the Alert Management List
and details pages.
If the existing alert is already resolved, GitLab creates a new alert instead.
Recovery alerts
Introduced in GitLab 13.4.
The alert in GitLab is automatically resolved when an HTTP Endpoint
receives a payload with the end time of the alert set. For HTTP Endpoints
without custom mappings, the expected
field is end_time. With custom mappings, you can select the expected field.
You can also configure the associated incident to be closed automatically when the alert resolves.
Link to your Opsgenie Alerts (PREMIUM)
Introduced in GitLab 13.2.
WARNING: We are building deeper integration with Opsgenie and other alerting tools through HTTP endpoint integrations so you can see alerts in the GitLab interface. As a result, the previous direct link to Opsgenie Alerts from the GitLab alerts list is deprecated in GitLab versions 13.8 and later.
You can monitor alerts using a GitLab integration with Opsgenie.
If you enable the Opsgenie integration, you can't have other GitLab alert services active at the same time.
To enable Opsgenie integration:
- Sign in as a user with the Maintainer or Owner role.
- Navigate to Monitor > Alerts.
- In the Integrations select box, select Opsgenie.
- Select the Active toggle.
- In the API URL field, enter the base URL for your Opsgenie integration,
such as
https://app.opsgenie.com/alert/list. - Select Save changes.
After you enable the integration, navigate to the Alerts list page at Monitor > Alerts, and then select View alerts in Opsgenie.