GitLab subscription (PREMIUM)
GitLab offers tiers of features. Your subscription determines which tier you have access to. Subscriptions are valid for 12 months.
GitLab provides special subscriptions to participants in:
Choose a GitLab subscription
When choosing a subscription, there are two factors to consider:
Choose between GitLab SaaS or GitLab self-managed
There are some differences in how a subscription applies, depending if you use GitLab SaaS or GitLab self-managed:
- GitLab SaaS: The GitLab software-as-a-service offering. You don't need to install anything to use GitLab SaaS, you only need to sign up and start using GitLab straight away.
- GitLab Dedicated: a single-tenant SaaS service for highly regulated and large enterprises.
- GitLab self-managed: Install, administer, and maintain your own GitLab instance.
On a GitLab self-managed instance, a GitLab subscription provides the same set of features for all users. On GitLab SaaS, you can apply a subscription to a group namespace. You cannot apply a subscription to a personal namespace.
NOTE: Subscriptions cannot be transferred between GitLab SaaS and GitLab self-managed. A new subscription must be purchased and applied as needed.
Choose a GitLab tier
Pricing is tier-based, allowing you to choose the features which fit your budget. For information on what features are available at each tier for each product, see:
Find your subscription
The following chart should help you determine your subscription model. Select the list item to go to the respective help page.
graph TD

A(Is your user account on GitLab.com?)
A --> B(Yes)
A --> C(No)
B --> D(fa:fa-link View your subscription on GitLab.com)
C --> E(fa:fa-link View your self-hosted subscription)

click D "./gitlab_com/index.html#view-your-gitlabcom-subscription"
click E "./self_managed/index.html#view-your-subscription"
Customers Portal
With the Customers Portal you can:
- Change your personal details
- Change your company details
- Change your payment method
- Change the linked account
- Change the namespace the subscription is linked to
- Change customers portal account password
Change your personal details
Your personal details are used on invoices. Your email address is used for the Customers Portal login and license-related email.
To change your personal details, including name, billing address, and email address:
- Log in to the Customers Portal.
- Select My account > Account details.
- Expand the Personal details section.
- Edit your personal details.
- Select Save changes.
Change your company details
To change your company details, including company name and VAT number:
- Log in to the Customers Portal.
- Select My account > Account details.
- Expand the Company details section.
- Edit the company details.
- Select Save changes.
Change your payment method
Purchases in the Customers Portal require a credit card on record as a payment method. You can add multiple credit cards to your account, so that purchases for different products are charged to the correct card.
If you would like to use an alternative method to pay, please contact our Sales team.
To change your payment method:
- Log in to the Customers Portal.
- Select My account > Payment methods.
- Edit an existing payment method's information or Add new payment method.
- Select Save Changes.
Set a default payment method
Automatic renewal of a subscription is charged to your default payment method. To mark a payment method as the default:
- Log in to the Customers Portal.
- Select My account > Payment methods.
- Edit the selected payment method and check the Make default payment method checkbox.
- Select Save Changes.
Change the linked account
To change the GitLab.com account linked to your Customers Portal account:
- Log in to the Customers Portal.
- In a separate browser tab, go to GitLab SaaS and ensure you are not logged in.
- On the Customers Portal page, select My account > Account details.
- Under Your GitLab.com account, select Change linked account.
- Log in to the GitLab SaaS account you want to link to the Customers Portal account.
Change the linked namespace
To change the namespace linked to a subscription:
- Log in to the Customers Portal with a linked GitLab SaaS account.
- Navigate to the Manage Purchases page.
- Select Change linked namespace.
- Select the desired group from the This subscription is for dropdown. For a group to appear here, you must have the Owner role for that group.
- Select Proceed to checkout.
Subscription charges are calculated based on the total number of users in a group, including its subgroups and nested projects. If the total number of users exceeds the number of seats in your subscription, your account is charged for the additional users and you need to pay for the overage before you can change the linked namespace.
Only one namespace can be linked to a subscription.
Change Customers Portal account password
To change the password for this customers portal account:
- Log in to the Customers Portal.
- Select the My account drop-down and select Account details.
- Make the required changes to the Your password section.
- Select Save changes.
Community program subscriptions
GitLab for Education
For qualifying non-profit educational institutions, the GitLab for Education program provides the top GitLab tier, plus 50,000 CI/CD minutes per month.
The GitLab for Education license can only be used for instructional-use or non-commercial academic research.
Find more information on how to apply and renew at GitLab for Education.
GitLab for Open Source
For qualifying open source projects, the GitLab for Open Source Program provides GitLab Ultimate, plus 50,000 CI/CD minutes per month. For more information, see program requirements, renewals, and program benefits.
If you have any questions, send an email to opensource@gitlab.com for assistance.
License requirements for GitLab for Open Source Program members
GitLab for Open Source Program benefits apply to an entire GitLab namespace. To qualify for the GitLab for Open Source Program, all projects in an applicant's namespace must carry an OSI-approved license.
To add a license:
- On the top bar, select Main menu > Projects and find your project.
- On the overview page, select Add LICENSE. If the license you want is not available as a license template, manually copy the entire, unaltered text of your chosen license into the
LICENSEfile. Note that GitLab defaults to All rights reserved if users do not perform this action.
Applicants must add the correct license to each project in their respective groups or namespaces When you're sure you're using OSI-approved licenses for your projects, you can take your screenshots.
Verification for Open Source Program
As part of the application verification process, you must upload three screenshots:
Benefits of the GitLab Open Source Program apply to all projects in a GitLab namespace. All projects in an eligible namespace must meet program requirements. However, if you submit materials for one project in your namespace, the open source program team uses that project to verify the contents of the entire namespace you use when applying to the program.
Screenshot 1: License overview
- On the top bar, select Main menu > Projects and find your project.
- On the left sidebar, select your project avatar. If you haven't specified an avatar for your project, the avatar displays as a single letter.
- Take a screenshot of the project overview that clearly displays the license you've chosen for your project.

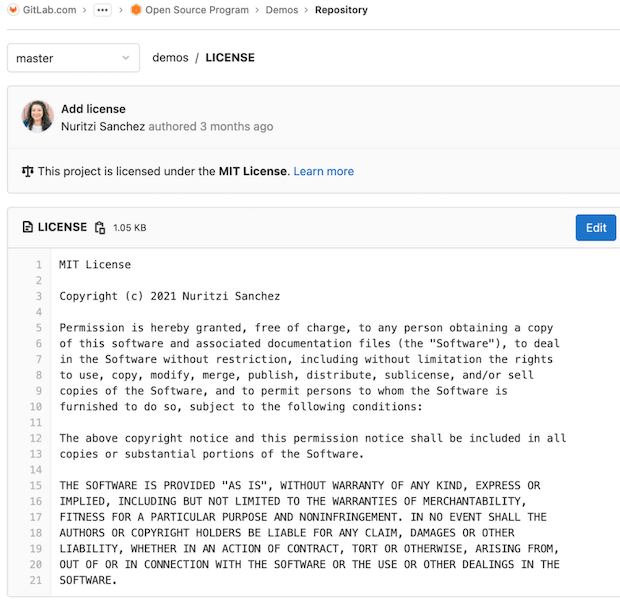
Screenshot 2: License contents
- On the top bar, select Main menu > Projects and find your project.
- On the left sidebar, select Repository and locate the project's
LICENSEfile. - Take a screenshot of the contents of the file. Make sure the screenshot includes the title of the license.
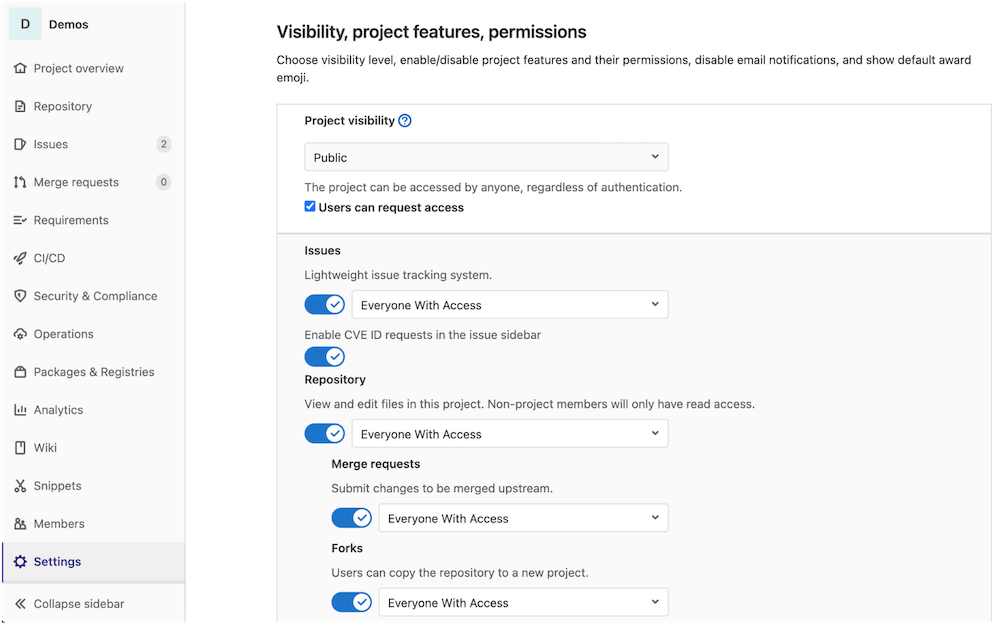
Screenshot 3: Publicly visible settings
To be eligible for the GitLab Open Source Program, projects must be publicly visible. To check your project's public visibility settings:
- On the top bar, select Main menu > Projects and find your project.
- From the left sidebar, select Settings > General.
- Expand Visibility, project features, permissions.
- From the Project visibility dropdown list, select Public.
- Select the Users can request access checkbox.
- Take a screenshot of this view. Include as much of the publicly visible settings as possible. Make sure to include your project's name in the upper-left of the screenshot.
NOTE:
Exceptions to this public visibility requirement apply in select circumstances (for example, in cases where a project may hold sensitive data). Email opensource@gitlab.com with details of your use case to request written permission for exceptions.
GitLab for Startups
For qualifying startups, the GitLab for Startups program provides the top GitLab tier, plus 50,000 CI/CD minutes per month for 12 months.
For more information, including program requirements, see the Startup program's landing page.
Send all questions and requests related to the GitLab for Startups program to startups@gitlab.com.
Support for Community Programs
Because these Community Programs are free of cost, regular Priority Support is not included.
As a community member, you can follow this diagram to find support:
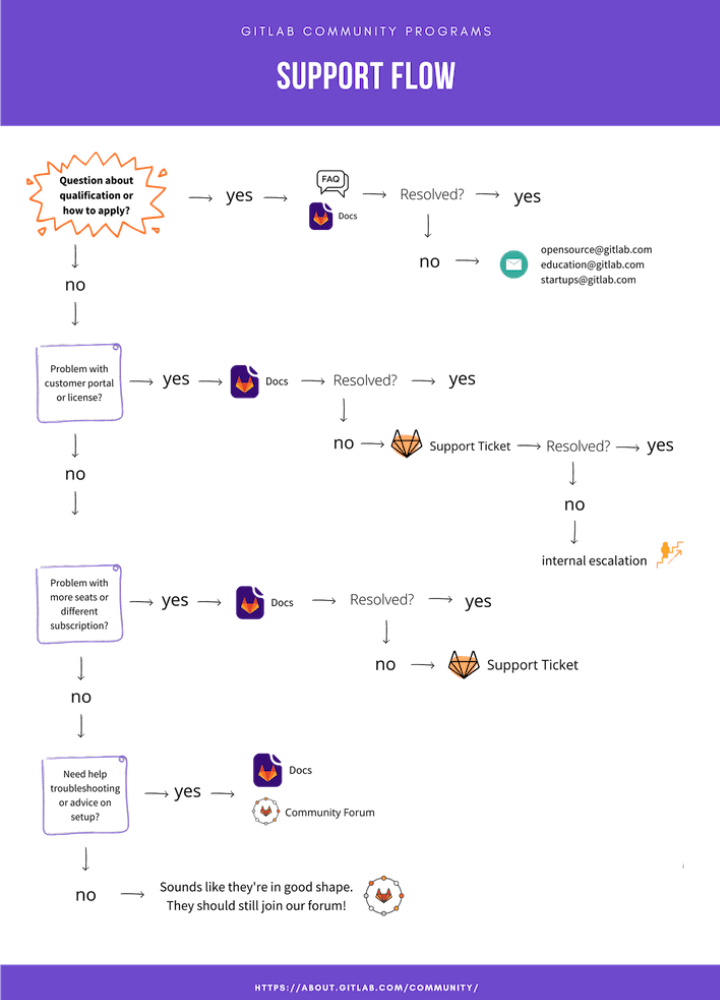
Contact Support
Learn more about:
- The tiers of GitLab Support.
- Submit a request via the Support Portal.
We also encourage all users to search our project trackers for known issues and existing feature requests in the GitLab project.
These issues are the best avenue for getting updates on specific product plans and for communicating directly with the relevant GitLab team members.